

How To Connect Ip Cameras To My Nvr
For years, many customers have asked me what is the best fashion to to connect an IP camera to an NVR (Network Video Recorder). In this article, I volition describe what I think are the best settings yous should accept in your NVR and IP cameras.
I affair I volition recommend to you is to investigate how your network is laid out and have some cognition of how many computers are connected to your network. This mode, it will prevent any IP conflict when configuring the IP camera and the NVR security recorder. By default, all of our recorders will be ready with a static 192.168.1.108 and the majority of the IP cameras will be DHCP.
The easiest way to effigy what to practice at this betoken is to connect the recorder to the ability supply that comes with the unit of measurement and then connect an Ethernet cable from your router to the Ethernet port of the NVR. After the unit turns On you will then need to go to the network settings of the NVR. Of course, yous demand to be connected to a monitor to run across these settings.
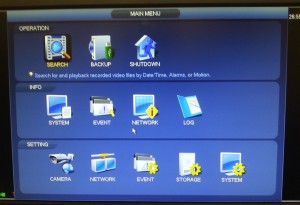
Almost of our NVRs will have a new interface, the "bluish interface", and the menus volition be spread out a chip different than the previous version. At this point yous will notice that in that location are three parts of this window menu: The top is operation, mid is info, and bottom is setting. Go to network and the following page will brandish:
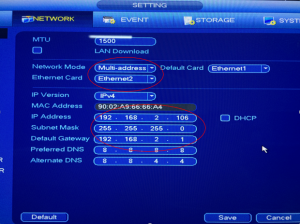
Depending on the type of NVR you have, some will have additional settings, just overall the steps are the same. We will exist focusing on getting an IP address for the NVR. Click on DHCP, use and relieve. You will be kicked out of that carte du jour and in a few seconds your NVR volition contact the router to get an bachelor IP address. Go back to the network settings to run into what IP accost you received. Normally what I will practise is to gear up the IP address to a digit college than what the NVR was assigned. This way I volition avoid any IP conflicts in the network. Certain router's DHCP settings will start from 192.168.ane.100 all the way to 192.168.ane.254 and it also depends on the network scheme and who configured the router initially. Assuming that the router's scheme is within the numbers above I volition set the NVR with the post-obit IP: 192.168.ane.200.
Now that I take that out of the manner the next matter to do is configure the IP cameras. In the past, all of our IP cameras used to exist configured with this IP address: 192.168.1.108. Many times customers and installers used to connect all the cameras at the same time without because that it could crusade a major problem when trying to assign an IP address to the camera or even to have the cameras prove upward in the tool finder (Config Tool). Nowadays most of our cameras are configured every bit DHCP. Therefore, if you have a router in the aforementioned network equally the NVR, and so most probable the camera will get an IP accost from the DHCP pool setup in the router as before long equally it is connected to the the POE switch that they will be connected to.
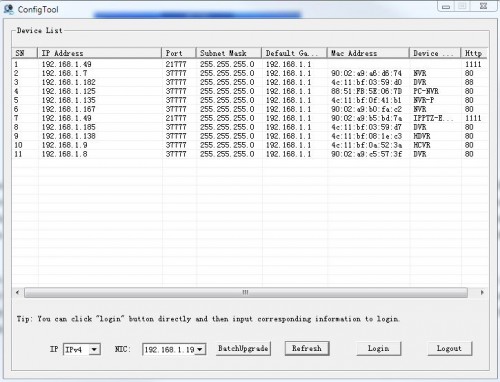
Here a snapshot of the config Tool:
Camera CONFIGURATION PROCESS
Open the config tool and it should populate all of the IP addresses that your equipment got assigned from the network.
NOTE: There IS Not A 100% GUARANTEE THAT ALL THE CAMERAS WILL Exist DHCP. THEREFORE, IT COULD Not Show ALL OF THE CAMERAS Continued IN THE NETWORK. AT THAT Bespeak IT Volition Exist RECOMMENDED TO CONNECT One Photographic camera AT THE Time AND Modify EACH IP Accost Every bit YOU CONNECT EACH CAMERA.
Assuming that each camera showed upwardly in the tool, click on 1 of the IP addresses and a box volition appear asking you for a username and countersign:
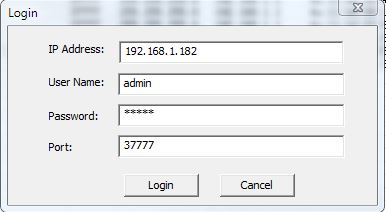
Click on login to access the camera's IP interface:
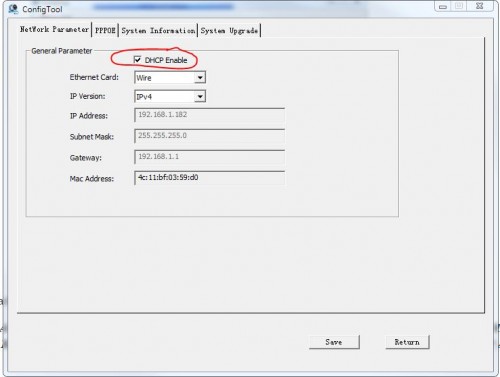
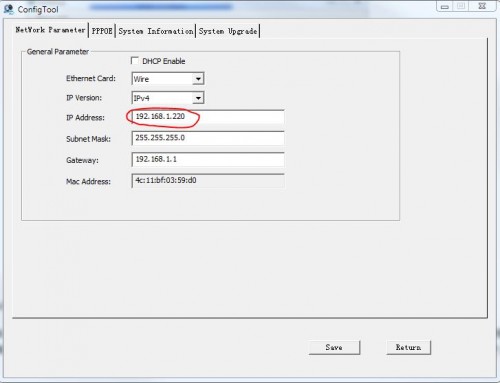
If the photographic camera is configured DHCP most likely it will evidence like the moving-picture show higher up. Noticed the IP address field along with subnet mask and gateway are greyness out. Uncheck the DHCP option marked in reddish and now you will be able to change the last digit of the camera's IP address to something different. Similar I said before, I will modify this camera'southward IP address to 192.168.1.220 and click save.
Now that we take assigned an IP address in the photographic camera, information technology is time to admission the photographic camera'due south settings and features. To do so, you lot will need to open Net Explorer and begin to set up upward some of the features of the browser. Click on this link https://www.securitycameraking.com/securityinfo/forum/remote-viewing-software/web-service/ to follow stride by footstep of how to setup this feature.
Type the IP Address of the camera on the address bar of your browser to access the web service. Once the web service comes upward, input the username and password. The default username and password for our cameras is "admin". Subsequently accessing the camera make sure the ActiveX files are installed. They will be needed to access and configure Video resolutions, Schedule, etc.
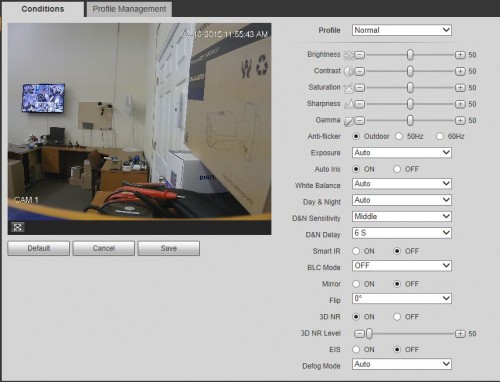
On the left side of the camera settings become to atmospheric condition to arrange the brightness, dissimilarity, HUE etc. I usually get out these settings alone, and merely change them depending on the environment.
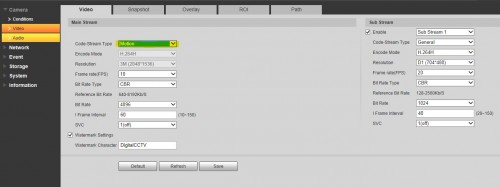
Click on video to configure the resolution of the camera, Frames per 2d, Encoding, etc. This part of the settings is crucial because it has to exercise with the recording resolution. Notice that y'all have two columns: I label is Main Stream and the other is Sub Stream. In a nutshell, this is referring to recording streaming and viewing streaming. The Master Stream settings will affect how the camera sends the prototype to the NVR over the network, among other things; it will likewise affect recording quality and how many FPS (Frames per Second) your NVR will be able to use as each camera gets added to each of the NVR Channels.
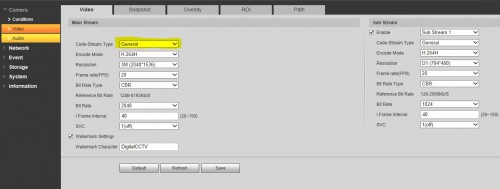
NOTE: DVRs accept a maximum corporeality of FPS (frames per second) that they can handle. In the instance of NVRs, the majority of them are restricted to an amount of incoming bandwidth, which information technology makes certain NVRs to support higher resolutions. Although that is a true statement, I will never have cameras connected to the unit of measurement using the maximum bandwidth they can handle, because realistically a network can merely handle then much data at i time. For those NVRs with a fixed incoming bandwidth, y'all will demand to divide the advertised speed by the corporeality of cameras connected to the NVR to realize what bit rate each of the cameras demand to be prepare at. Too, you near consider that the incoming bandwidth is shared also with the sub stream. So, on an NVR that supports 200Mbps for incoming bandwidth you lot will need to allocate 32 Mbps for the Sub Stream, so at the end you will have 168Mbps available in the Main Stream to stream and record.
In one case y'all take decided how many cameras you lot volition be adding to the NVR, it is important to configure the correct FPS, Bit Rate Type and Bit Rate. For the Fleck Rate Blazon I recommend "CBR" (Constant Flake Rate) instead of "VBR" (Variable Scrap Rate), this fashion the camera volition constantly use a predetermine amount of data y'all set nether Flake Charge per unit. The Bit Rate settings volition vary depending on what resolution the camera is configured. For a 1080p resolution I volition ready the Scrap Rate to 1024 (1MB) and the FPS to xv. This amount of information is more than enough to stream one photographic camera at 1080p without loosing pixels.
Next nosotros will set the Sub Stream settings. These settings will not affect recording video quality; instead it volition bear on the style the video performs over a smart phone while using our app TechproSS or TechproSS plus. This is mainly just for viewing purposes and should exist prepare to D1 at 7 FPS or 10 FPS. The Flake Rate type is fine if nosotros utilize CBR, and the Fleck Charge per unit can be set anywhere between 250 Mbps to 320Mbps. Also make certain the Enable option for this Stream is checked, otherwise you will not exist able to view whatsoever kind of video while viewing the cameras over the phone or NVR local Interface. Nether "Code-Stream Blazon", click on the Drop Down and cull Motion. Noticed that the Encode Mode and Resolution are now gray out, and this means that you can only change the FPS and Fleck Rate to impact how motion events occurs. These settings are ideal when recording based on Motion only, so you can have the Main Stream at a less intense setting and the NVR will record at a higher FPS and resolution when Motility happens due to these settings. Click Save when done.
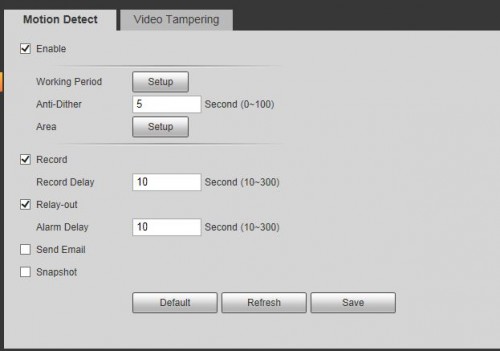
Go on to "Event > Video Discover". In here nosotros can enable the movement detection feature of the camera. Also, we can arrange the "Anti-Dither". This acts similar a filibuster to forbid imitation motion events. The higher the number, the higher the delay the camera will react to motility events. Right now, I like these settings shown in this picture:
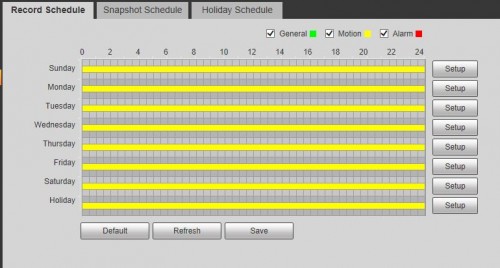
Next option is the Schedule. Click on "Storage > Schedule" and yous tin can ready now Motion recording for every day 24/7. Always think to save your settings.
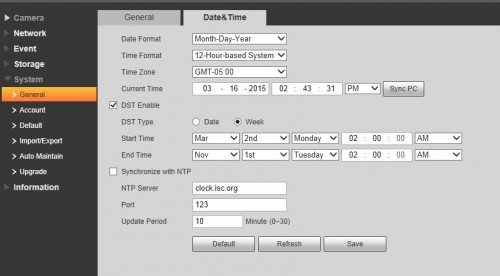
We are almost done configuring the photographic camera. The last matter we need to make certain we have correct is the Time Zone and Date and Time. This is so the info will be displayed correctly in the NVR. You tin click on "Sync PC" button to get the Time and Date of your PC instead of doing it manually. DST is another selection y'all could set up if you lot want the camera to modify its fourth dimension when the fourth dimension changes occurs. Notation: I will much rather to become DST configured over using an NTP server, considering the NTP server works with the Time Zone of the Camera and the NVR. I have seen that I'm strength to change the Fourth dimension Zone when the fourth dimension changes. Typically DST occurs the 2nd week of March and the first calendar week of November every year, only is worth give it a try in my opinion. Bank check the net for more details about the time irresolute based on a the upcoming years.
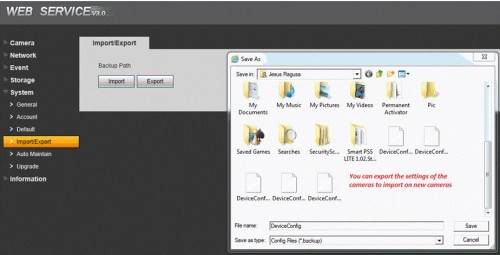
Lastly you could export all of these settings if yous take many cameras to apply this to. The file containing the settings of the camera will not change the IP address of the camera so is rubber to apply this to the cameras you are configuring.
HOW TO Add together THE CAMERAS TO THE NVR
Now for the last pace after all of the cameras and NVR are configured, we will need to add the cameras to the channels of the NVR. To me the easiest way to do this is from a PC accessing the NVR over the network. Open up Internet Explorer and begin typing the Internal IP address of the NVR.
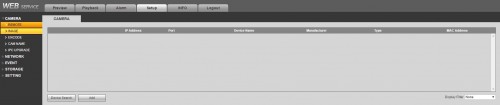
Go to Setup> Remote and you can click on device search. At this point the NVR will search the entire network and volition display the devices for y'all to select them and add them to the NVR.
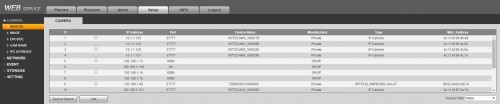
At this indicate, after we add the cameras they should evidence upward in the NVR spider web interface and the device listing below:

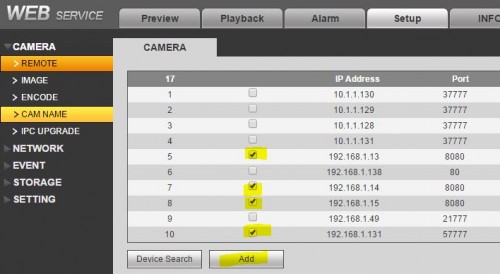
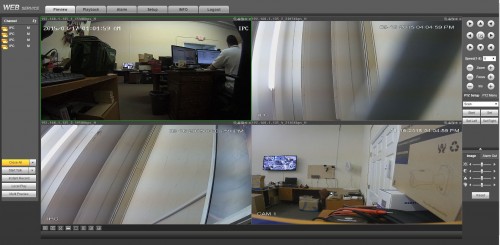
Here is how the cameras will wait in the web interface:
I hope this article volition help you lot empathise how this process works.

Source: https://www.securitycameraking.com/securityinfo/how-to-connect-an-ip-camera-to-an-nvr-network-video-recorder/
Posted by: murphyotibitepar.blogspot.com
0 Response to "How To Connect Ip Cameras To My Nvr"
Post a Comment